Introduction
The agent-based solution called Azure ARC for servers allows you to govern all your servers (Linux/Windows) which resided outside of Azure (located on-premises or in other public cloud providers) that you control from a central place. One of the nice things that comes with ARC is the IMDS (Instance MetaData Service) local endpoint declared during the enrollment and the fact that each ARC agent has a system assigned identity (MSI). In other words, each agent can interact with the Azure control/data plane without any password because the machine is the password. This is why keeping your machine up to date and doing least privilege is critical with this scenario.
The goal of this article will be to play with ARC with Azure storage API and demonstrate some current limitations we have. During this article we will see:
- How we’re used to interact with a storage account and the access keys (basics)
- How we can use ARC without exposing the access keys (good practice)
- How we can use ARC and upload a file with access keys deactivated (best practice)
Enroll the ARC agent
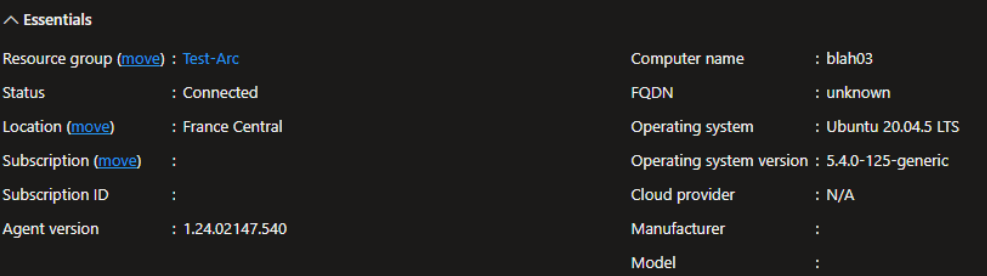
In this demo, I’ve decided to go with an Ubuntu server hosted on premises. To enrolled it in ARC, I’ve simply followed the script the portal proposes:

Once authenticated, the system should be marked as connected in the Azure portal:
Once enrolled, I’ve simply installed Powershell following this article. We’re now ready to customize the machine.
When you install ARC, a new user and group called himds is created and because I don’t want to sudo all the time, I simply add my current user called ubuntu to the group.
By default, the group himds have only execution permission, let’s add read which is mandatory to fetch access tokens later.
#Add ubuntu to hidms group
sudo usermod -a -G himds ubuntu
sudo chmod g+rx /var/opt/azcmagent/tokens
Ok now we will be able to generate access tokens from Powershell without using sudo. At this stage, we have our connected agent that has an identity. Let’s find it in the Azure portal under Entperprise app and change the filter to managed identity:

Copy the ApplicationId in your clipboard, you will need it later.
List blobs from a storage account (Basics)
This is the simplest way where we will use the access keys.
# Az.Storage module required
$Ctx = New-AzStorageContext -StorageAccountName <your storage acc> -StorageAccountKey "mTuvV...diRi+Rg=="   # your access keys
Get-AzStorageBlob -container '<your container>' -Context $ctx -WarningAction SilentlyContinue | % Name
Here the result:

As we can see, listing, uploading, and downloading blobs are simple when you use the access keys. The problem is …. we use the access keys, and we have to commit them somewhere.
List files without exposing the access keys (good practice)
This is where ARC will start to shine but with customization only. We can’t sadly login to Azure with connect-azaccount –identity like we do from an Azure VM with Powershell. ARC is not fully integrated yet with the azure.identity library.
Make sure first you grant a proper RBAC (contributor/storage account contributor) to access the control plane (not the data plane) of your storage account (to access the access keys).
Let’s load this custom function in memory. It’ a custom function where you will be able to fetch access token from an Azure VM, an ACI container, an Azure function but also and ARC for servers agent with the same command for various audiences.
Now we can generate a token to access in this case the https://management.azure.com scope

If we paste this token in jwt.ms, we will see the token is for the Azure control place (ARM) and the identity that generated it is our ARC agent!
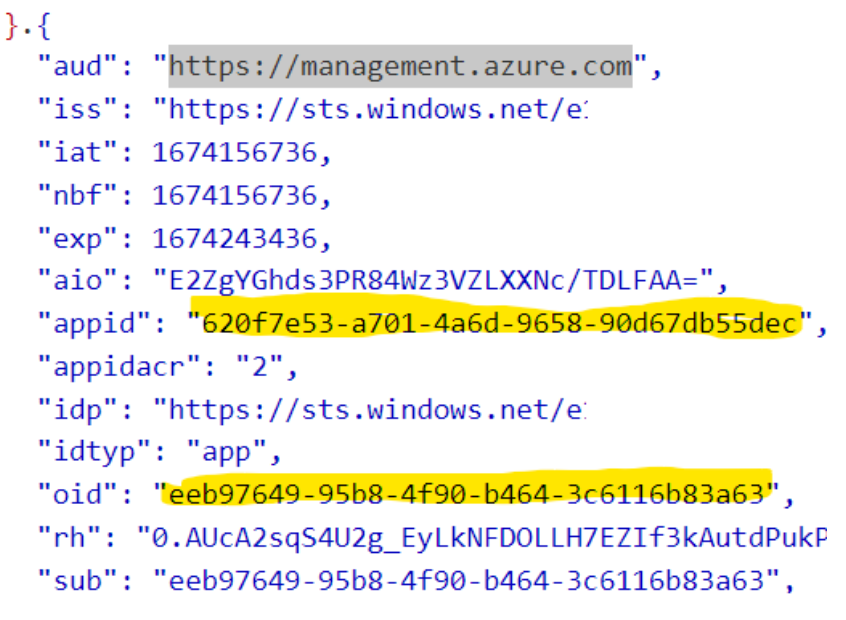
The Appid is the Application Id and the oid is the objectid of our arc agent. Now did you know you can connect with connect-azaccount with an access token? The accountId parameter is the ARC app id.
# Az.Account module required
$token = Get-AccessTokenWithAzIdentity -Audience ARM
Connect-AzAccount –AccessToken $token –AccountId ‘<your arc agent client ID>’

Now you should be connected as your ARC agent! Why it’s working? Connect-azaccount connects you to the Azure control plane. Because we have generated a token for the audience https://management.azure.com and because module Az.account lets us connect with an accesstoken directly, we can now interact with all APIs which depends on this audience.
Let’s start with the limitation first. If you try to generate a storage context you will receive:
$Ctx = New-AzStorageContext -StorageAccountName <your storage acc> -UseConnectedAccount

And this is “normal”, the SDK behind the Powershell Az module can’t generate a new token to access the storage audience (https://storage.azure.com). This technique can work from an Azure VM directly but not from an ARC machine. I hope Microsoft will improve this limitation soon.
But, because we can interact with the control plane, we can first list the storage accounts and we will see in the results storage context are included. Let’s try:
$st = Get-AzStorageAccount -Name <your storage acc> -ResourceGroupName <your RG>
Get-AzStorageBlob -Container '<your container>' -Context $st.Context | % Name
Here the result:

This is better than using the access keys directly.
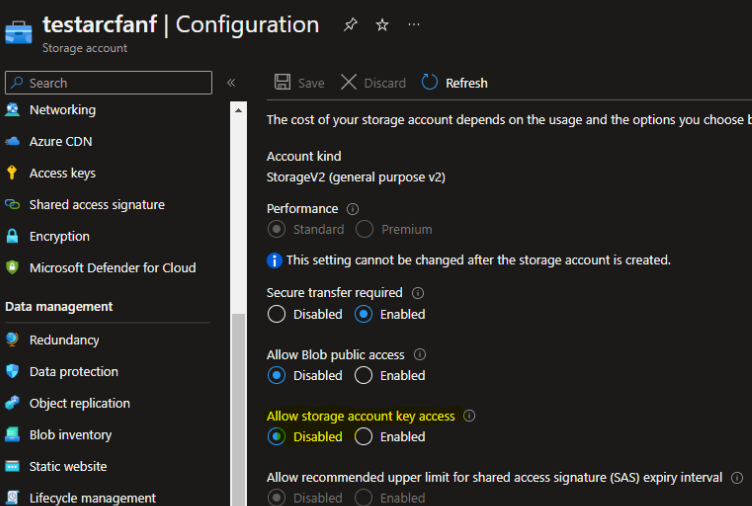
List file with access keys disabled (best practice)
Let’s first disable the keys. Under configuration you should see:
In addition, let’s assign RBAC to this identity (the ARC MSI) the same way you could do this with your user or a service principal. In this demo environment, I’ve decided to assign Storage Blob Data Contributor to the storage account.
Finally, we will have to load a new function in memory you can find here to list blobs through REST API. Sadly, I didn’t find a way to make it work with the Az.Storage module (in the next article you will see I did with Keyvault).
$tokenST = Get-AccessTokenWithAzIdentity -Audience Storage
Get-StorageBlobs -StorageAccount '<your storage acc>' -Container '<your container>' -AccessToken $tokenST | % EnumerationResults | % blobs | % blob
Here the result:

The function is badly written, but you get the concept. This time, we’re using only the modern authentication (Oauth2.0) instead of the access keys. In term of security, this is the top, you can’t commit your access keys/SAS token (it’s disabled) and you follow the principle of least privilege because you only grant required permission.
Conclusion
I hope it was useful, at least now you know you can play with the Azure storage API from anywhere without using any password. Even better, you can improve your security posture by simply disabling the access key on your storage account. See you for the next one where we will play with Key Vault.