Introduction
In the previous article, I’ve explained what I did with ARC and this time, I’ve wanted to go deeper. Few month ago, I’ve played with Azure DevOps (AzDO). You can find my shift left mindset researches here. This time, I’ve wanted to do the same thing, but without any password stored anywhere except in my Keyvault. We usually declare variables in the provider to define connection string or environment variables. This is what we want to avoid during this demo. The goal of this article will be to see how I’ve played with both Windows and Linux agents to deploy and test my infrastructure. As you can imagine, this demo is not production ready. I’ve tried to include as much as possible concepts with the smallest amount of lines of code. So, if it’s weird, it’s normal! To be able to be “passwordless” today, you have to use self-hosted agent. I’m far to be a Github guru, this is why I’ve decided to follow Github recommendations and make my repo private. You will be able to find a public copy of my private repo here.
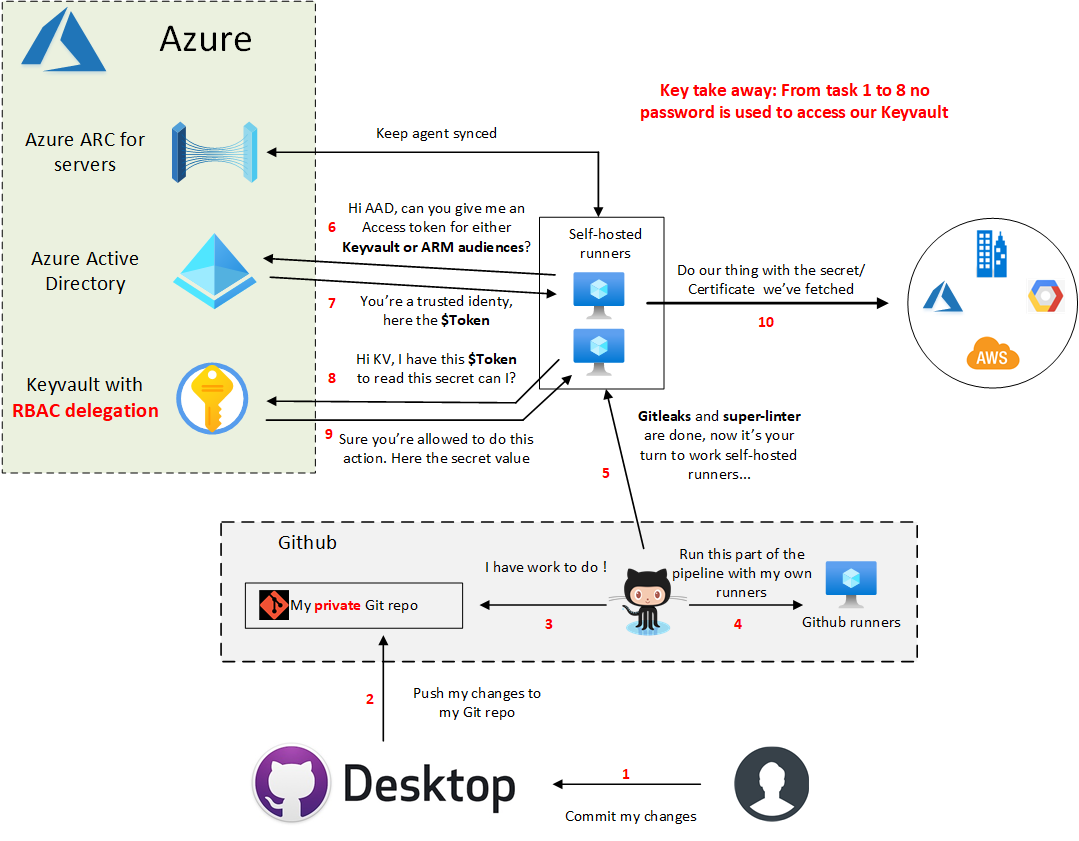
Here what we will build during this demo :
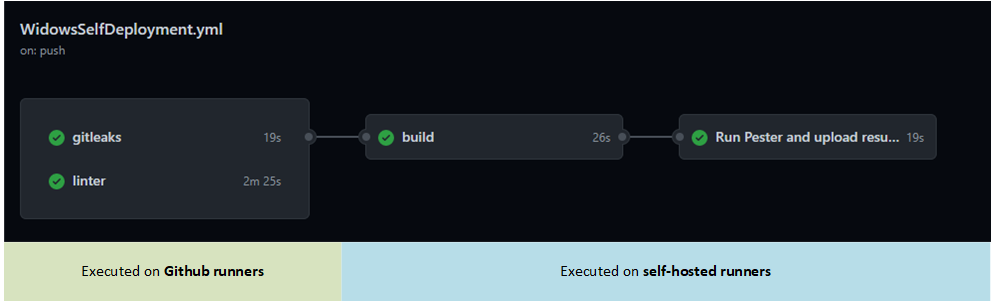
Which will generate this pipeline:
During this demo, we will:
- Play with Powershell 7 (This demo won’t work in 5.1):
- We will use custom functions to get an access token or a Keyvault secret
- Use Pester 5 module for the infrastructure tests
- Use cross-platforms code. The same code can be used on both Linux and Windows self-hosted runners.
- Use Gitleaks and Super-Linter projects to improve our code quality/security. I won’t use Az SDK this time.
- Discover that Azure CLI which is in front of almost every aspects compared to Az Powershell can’t sign-ins with an access token where Powershell can.
Prerequisites
To be able to use this demo, we will need few things:
- A susbcription
- An account to be able to do RBAC delegation + create App registration
- A Keyvault deployed with RBAC mode, not access policies
- Create a clientID/Secret for the Azure CLI authentication (Because CLI can’t sign-ins with access token)
- Create a secret in Keyvault where the name of the secret is the clientId previously created. My code is using the AppIs as secretname :)
Windows Self-hosted agent
Here what I did to prepare my agent:
- Install a fresh Windows server 2019
- Install the Github self-hosted agent service as local admin, not NETWORK SERVICE. We need a local admin session to generate our access tokens. NETWORK SERVICE can’t really open a session to my knowledge.
- Install the ARC agent
- Install Powershell 7
- Create a profile.ps1 file located in the $PSHOME folder. Doing this the profile will load on all users’ sessions. If you prefer you can create a profile in the local admin context instead.
- Fill the profile.ps1 with these 2 functions. First the New-ARCAccessTokenMSI and then Get-KeyvaultSecretValue. Those 2 functions will help you to generate access tokens from the ARC agent to reach various audiences and the second one to simply access a secret from REST with the previously generated access token. You can find more use cases in my previous article.
- Install the Az Powershell module
- Install the Azure CLI
Then open your Keyvault, go to your Azure CLI secret previously created (the name should be the AppId), and grant your self-hosted runner Key Vault Secrets User permission.
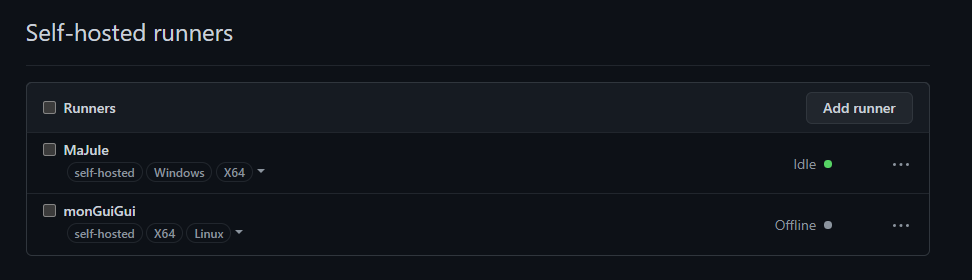
At this point, we should be able to generate access token for the Keyvault audience from our ARC agent! Once you’ve done those actions, you should see in Github/settings/Action, your agent(s) in green state :
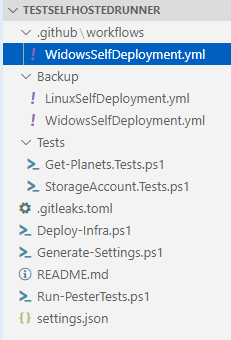
You can clone the repo and replace the values with yours in the settings.json file. Then before pushing this code to your private repo, make sure also that the WindowsSelfDeployment.yml is located under the .github/workflows folder. If not, simply copy/paste from the one located in the backup folder. You can now commit and push to Github which should start the pipeline.
Let’s configure the Linux agent and then continue the demo.
linux Self-hosted agent
Compared to my Windows agent which run locally on Hyper-V, I’ve decided to deploy my Linux agent in Azure (I don’t have an easy GCP/AWS playground). Here what I’ve done on the machine:
- Install a fresh 18.04 Ubuntu server
- Install the Github self-hosted agent. You can’t run the ./config.sh in Root. Make sure you have the proper rights applied to your action-runner folder (not root) ;).
- Install Powershell
- Install Azure CLI
- Install the ARC agent
- Create the same as Windows profile.ps1 file within the $PSHOME folder.
Then I’ve ran ./run.sh & to avoid blocking my terminal and now the Github agent should become green in the settings/action tab. As before, allow the new service principal to access your secret in Keyvault and you’re done.
Explain the pipeline
The repo looks like this:
As explained before, I wanted to learn Github action. I’ve never played with it. This repo is just for a demo purpose, it’s not production ready.
In this repo, there is 2 deployment files which are almost identical. The differences are:
- Backslash and forward slash for file path depending on the self-hosted runner Operating System
- Labels linux/windows to target the good agent when you have the two enabled
- sudo word in front of the Powershell execution. Today Powershell does not support sudo parameter in a cmdlet. You have to be local admin/”root” to contact the local MSI endpoint and being able to generate an access token.
==== The worflow is ====:
Runs on the GH agent in parallel:
- Gitleaks to validate you didn’t commited secrets
- Super-linter to validate your code quality on various languages
THEN build our infrastructure from a the Self hosted agent:
- Execute the Deploy-Infra.ps1, load variables from settings.json file depending the self-hosted runner OS.
- Use the New-ARCAccessTokenMSI function to generate an access token (AT) for KV audience.
- Use the Get-KeyvaultSecretValue function to get the Azure CLI secret from KV with the previously generated AT.
- Log with Azure CLI as a service principal. From there you can imagine deploy your Terraform, Pulumi or whatever. In my case, I’ve just use the CLI to create a storage account.
- I generate a new AT this time for the ARM audience. Why not?
- Connect to Azure using the Az Powershell module to Get the previously create storage account.
FINALLY test our infrastructure from a the Self hosted agent:
- Execute the Run-PesterTests.ps1 which configure the behavior of our Pester tests
- Then excute few tests on our infrastructure (our storage account)
- Then upload the artifact in Github for later usage
Conclusion
I think I’ve shown how we can interact with Azure or any other platforms without the first chicken/egg password. This is not a password less solution in the strict sense of the word, but according to me it’s a nice security/user improvement. You don’t know if tomorrow someone will find a way to expose Github credentials. Same thing for users, you will have to think to rotate credentials on regular basis. This solution tries to tackle those “burdens”. Let’s see how Microsoft will improve the user experience with both CLI and Powershell to simply be able to use the -MSI with ARC.
Here few take away from this article:
- With ARC, you’re not confronted to the chicken/egg problem. You can access your Keyvault from anywhere without any password.
- Your devs does not even know what the passwords, only your runners should access the Keyvault.
- If no one has access to passwords, it means you can roll all your secrets easily.
- If you don’t use the guest policy, this service is free.
See you in the next one!