Introduction
Now that we covered basics in the previous article, let’s go a step higher and build a multi-tiers application composed in our case with a frontend (Powershell console) and a backend api (Azure function). This time the psoauth2 module won’t be useless anymore. We will use it to validate the access token we will send to our backend api. What we build during this demo is not designed to manage big workloads. If you plan to create serious api, you will have to implement caching (AAD signature keys, access tokens, …).
Here what we will build during this demo:
- We will create a frontend AAD app that will oversee the user authentication part. From there, we don’t need any app roles, user assignment or any other configuration except we will consume the backend exposed API. This app will be configured as confidential app even if there is no secret assign to it to allow only the auth code flow with PKCE that I’ve talked about in previous demos. As before, it will be a Powershell console to simulate our frontend application.
- Then we will need to pay attention to our backend AAD app. Our backend API will be publicly accessible (basic consumption Azure function) and therefore verifying token will be critical. We will enforce user authentication, create app roles and verify the access tokens for each request. Once all verifications are done, our API will call Graph.
- Finally because we will use public Azure function, I don’t want anyone to be able to call them. Long story short, even if you won’t be able to fully execute the function because the token validation will answer you’re unauthorized (401), I will be billed for the executions! Azure proposes a magical tool to avoid this which is called easy auth.
In this article we will learn:
- App roles
- How to protect a backend api with AAD
- What does verify a token means?
- How to use the On Behelf Flow (OBO)
- Azure easy auth
App roles
According to the doc, an app role lives within an AAD application (manifest). In other words, you remove the app registration, you remove the role. Using app role is a simple way to implement RBAC within your application because AAD will expose a new roles claims you have to consume as an application (api, webapp,…). In this demo, we will imagine that our backend api will expose 3 app roles:
- Write.Access which will give you the possibility to list the whole tenant users with all related information. This is for the demo but imagine a permission a regular user does not have.
- Read.Access which will give you the possibility to call the /me graph endpoint which is perfect to demonstrate the OBO flow.
- Admin.Access which will allow us to execute both routes.
Create our AAD apps
As usual you can find the app creation code here.
The only new thing in this app creation is the way I create the 2 linked apps with code. I firstly create the backend app where I will “expose the api” and then consume this info with Get-APIScopesInfo (line 130) to inject it into my frontend AAD app (line 164).
For the rest, we’ve already covered the AAD app creation in the previous article.
Azure function App
Now that we have our AAD apps created, let’s deploy our 2 Azure functions. I won’t cover this part there is plenty of docs on Internet. Once your Powershell function App is created, we will generate 2 functions:
- The first one to simulate the application permission that you can find here.
- The second one to call the /me endoint (delegated permission) where you can find the code here.
But before being able to call our function, we need to upload our psoauth2 module to our function App. You can do this with CICD, but for our demo, we will use the portal itself.
In the function App menu, click on App Service Editor then Go:
In the new tab, create your Modules folder structure the way the documentation explains it (you can right click Create new folder …):
Then you simply have to drag and drop the module files to the right place. Nice job integration Microsoft!
That’s it our backend api are ready, here we don’t try to optimize our function, we just want to create a quick demo.
How our API will (should) work?
To summarize we can say that before our api do something, our api has to:
- First validate the token
- Then validate the user authorization (role)
- Only after those checks our api should do the work.
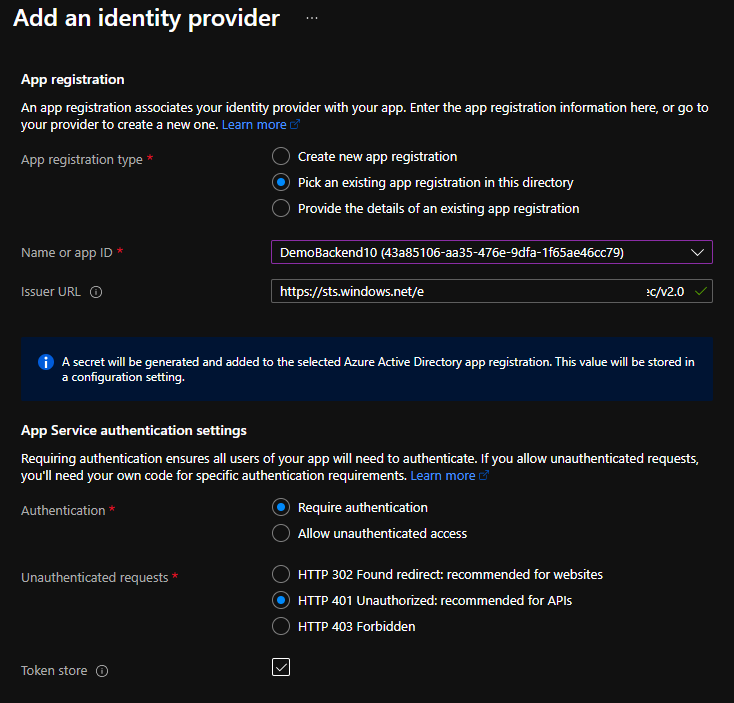
Protect our Azure function App with EasyAuth
Last interesting topic for this demo. we’ve created an Azure function to act as our backend api. If you check the code, you will see the azure function complete URL. Now because I validate the token (which is a mandatory parameter in our function), we know that only an authorized person will be able to fully call our API but in term of consumption, anyone can call my function with junk and at the end, I will be billed for those executions. how can we protect ourselves? This is where Easy Auth comes into place. I’ve already discussed about this topic in this article, but I wanted a single place to cover all topics.
To enable Easy Auth, it’s really Click, Click, Next. The only interesting part here is that you should use your backend api as audience.
Now if you try to contact your function with an anonymous request, you will receive:
You do not have permission to view this directory or page.
Now if you look at the issuer URL, you will see: https://sts.windows.net/TenantId/v2.0. The “funny” thing is that this is not the issuer you will see in your token in jwt.ms. Do you know why? Because sts.windows.net seems to propose both V1 and V2 tokens (legacy endpoint with plaster?) where https://login.microsoftonline.com/TenantId/v2.0 only provide V2 tokens exclusively. Try to change and it should work too.
Conclusion
Lot of information has been covered during this demo. I think we can highlight few takeaways:
- Even if our frontend does not have secret, we’re still be able to configure the AAD app as a confidential app to accept only one authentication flow which is the auth code flow here.
- App role exist within an app. It’s a good solution to implement authorization within your app. Just look at the roles claims in the token from your api.
- The API is responsible of validating both the token AND the authorization.
- Easy Auth is cool to protect your exposed api without any effort “for free”. You need a better protection, use service like APIM.
- If you plan to expose your single tenant backend API to only a set of users, don’t forget to enabled the the user assignment required under the properties menu (Enterprise app)
See you in the next article.